Integrate ERC20 Module to Connect Ethereum Network for Direct Exchange

Did you purchase Tradebox? If so, you need to integrate ERC20 token with the Tradebox software to get some remarkable advantages. ERC20 token is mainly a standard and highly recommended type of Ethereum token.
ERC20 token can assist you for creating and issuing smart contacts on the Ethereum network. Through smart contracts, you can be able to create a smart property or tokenized assets by using the Ethereum Blockchain network. As a result, the investors are being interested to invest in it.
Why Does ERC20 Need to Be Integrated?
Bdtask has launched one of the desired modules namely ERC20 for the Tradebox software which can create an extra-milestone of the users of Tradebox. You will get the ERC20 module as an add-on with the Tradebox software. So. you have to purchase this Tradebox software at first for getting this ERC20 (add-ons) module.
After integrating the ERC20 module, you will get a lot of advantages such as:
- Ensure direct deposit, withdrawal, and exchange
- Build a direct connection with the Ethereum network
- Support Ethereum-based coins and others
- Does Not required any third-party fees
- Allows coin adding request to promote other coins
- Easy to interact with other cryptocurrencies
- Allows to create a market with peer-exchanging
- Extend the exchanging network of Tradebox
- Easy to grab end-user attention
- Ensure to protect your token wallet with the private key
To grab all of these opportunities, you need to purchase the Tradebox software with ERC20 add-ons.
Note: This is not a standalone script; it is required to have Tradebox installed because the ERC20 Ethereum network is just a module of Tradebox - Cryptocurrency Trading Software.

How to Install & Setup the ERC20 Module with Tradebox?
Here, you will get a complete direction to install and set up the ERC20 module with Tradebox software. Please read the documentation carefully to learn how to install and use this add-on module in Tradebox.
Please read the documentation carefully to learn how to install and use this add-on module in Tradebox.
Server Requirement
- Node js must be installed on your server.
How to Install Node js on Your Server?
Here, I will provide a step-by-step direction to install Node js on your server.
- Go to your server terminal.
- Write commands on the terminal
- cd app/Modules/Erc20/Libraries/erc20
- npm install
- pm2 start server.js
Getting Started
To install this module, you have to perform a few simple tasks. Please follow the instruction below:
Install ERC20 Blockchain Network Module in Tradebox
First, you have to go to the Admin panel, then click on the Addons option. After that, you need to click on the Add Module. Then, click on the Install button. After clicking the install button, it will be successfully installed in your system.

Figure 1: Installation process of ERC20 Ethereum network
How to Configure the ERC20 Module?
After installing the ERC20 Ethereum network module, Admin can see the ERC20 module on the left side menu bar. In this ERC20, there will be eight sub-module such as,
- Node Server Setup
- Admin ERC20 Wallet Setup
- ERC20 Coin
- ERC20 Market
- ERC20 Coinpair
- Transaction Setup
- Coin Request ERC20
- Documentation
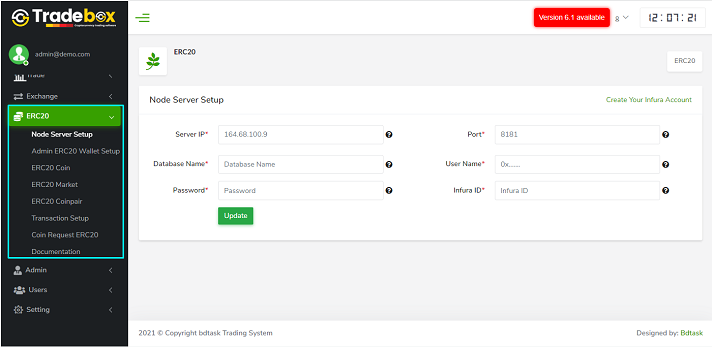
Figure 2: After Installing ERC20 Ethereum Network Module
You need to configure these sub-modules by following the given instruction. So, let’s start.
Step 1: Node Server Setup System
This one is the first sub-module of the ERC20 module and here you will get the direction to configure it.
- Server IP is located on your cpanel or hosting provider.
- Use 4 digit ports (except 8181). For example: 8282
- Create a new database on your hosting server and provide the database name.
- Provide your database user name.
- Provide your database password.
- Create an Infura Account and provide the project id/infura id in your system.
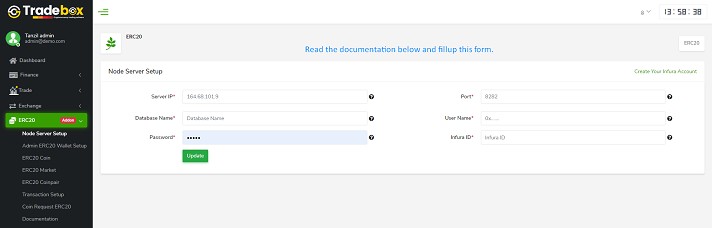
Figure 3: Node Server Setup
Step 2: Admin ERC20 Wallet Setup System
- Generate an ERC20 Wallet Address from metamask or another platform, then enter it into your system.
- Private key is provided by your ERC20 Wallet, then entered into the input field.
- Provide your Admin Login Password to verify your identity.

Figure 4: Admin ERC20 Wallet Setup
- You have to set up the URL in your server CRON jobs. All the important information is provided in the side notes.
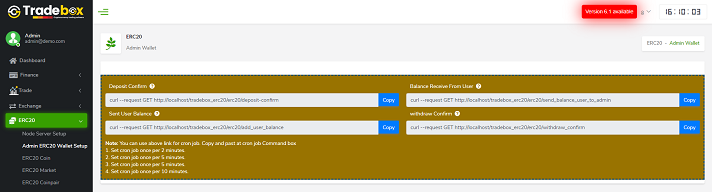
Figure 5: Cron jobs URL
Step 3: ERC20 Coin
Here, you can manage all the ERC20 coins.
- By clicking on the ERC20 Coin submenu, you can see the ERC20 coin list. In this list, admin can add or edit coins by clicking the links.

Figure 5: Coin list
- After clicking Add Coin Button, a new page will appear. Fill out all required fields, then submit them.
Ethereum contract address is the address of the place where your ETH is preserved. You can view Ethereum Contract address in Etherscan.
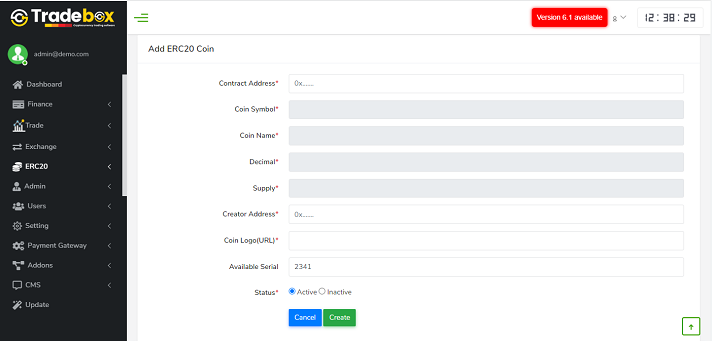
Figure 6: Add coin form
Step 4: ERC20 Market
- In ERC20 Market, the admin can add ERC20 Market by clicking the add link.
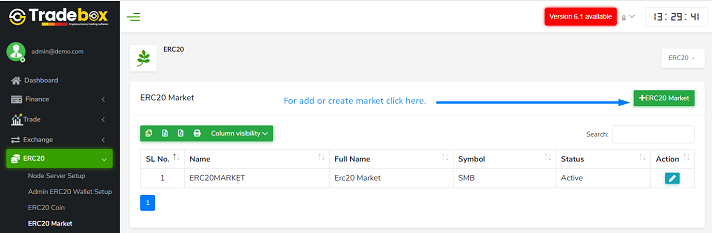
Figure 7: ERC20 Market list
- After clicking Add ERC20 Market Button, a new page will appear. Fill out all required fields, then submit them.
- Input a Market Name and Full Name in the input fields.
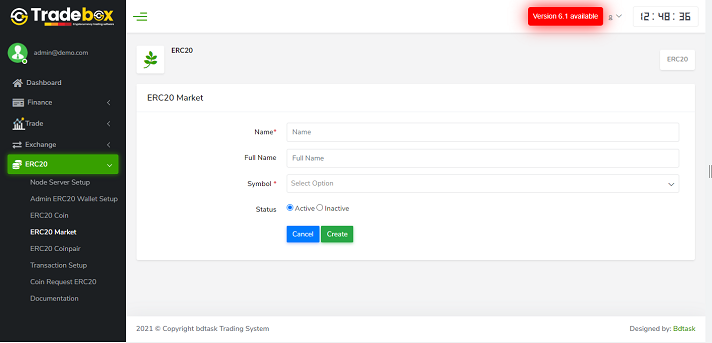
Figure 8: Add market form
Step 5: ERC20 Coinpair
- In ERC20 Pair, the admin can add ERC20 Pair by clicking the add link.
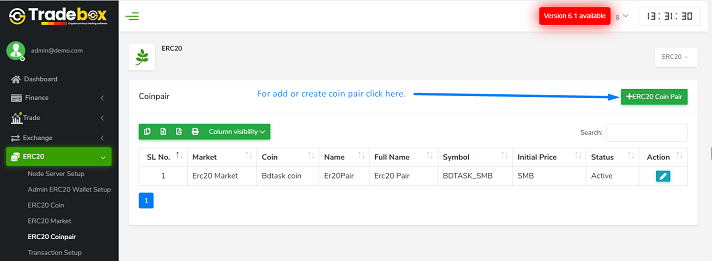
Figure 9: ERC20 pair list
- After clicking Add ERC20 Coin Pair Button, a new page will appear. Fill out all required fields, then submit them.
- Input a Pair Name, Full Name, and Initial Price in the input fields.

Figure 10: Add coin pair form
Step 6: Transaction Setup
- Here the admin can set up the transaction information like minimum amount and maximum amount.
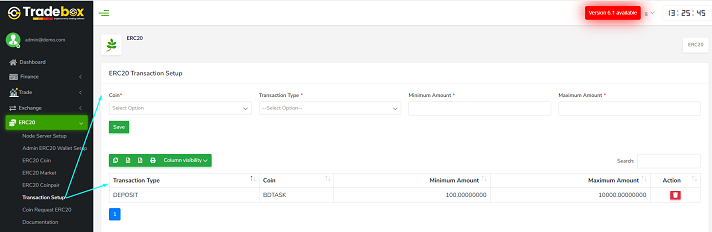
Figure 11: Transaction setup
Step 7: Coin Request ERC20
- If anyone wants to promote their coin, then they will request it. Here, the admin can see all the requests and provide the approval for promotion. So, all user requests for ERC20 coins will appear here. Admin can accept or reject coins by clicking the buttons.

Figure 12: Coin request ERC20
Step 8: Documentation
In our system, you will get complete documentation that will provide a step-by-step direction to configure this module.
Conclusion
ERC20 module is an essential feature for any cryptocurrency trading software that will allow the crypto entrepreneurs to connect their system with the Ethereum network and support all Ethereum-based coins. So, purchase the ERC20 add-ons and connect your system with a wider range of Ethereum networks for quick exchange. To get quick support contact us or WhatsApp us: +8801857675727, Email: [email protected].
Read More:

Contents
- Why Does ERC20 Need to Be Integrated?
- How to Install & Setup the ERC20 Module with Tradebox?
- How to Configure the ERC20 Module?
- Step 1: Node Server Setup System
- Step 2: Admin ERC20 Wallet Setup System
- Step 3: ERC20 Coin
- Step 4: ERC20 Market
- Step 5: ERC20 Coinpair
- Step 6: Transaction Setup
- Step 7: Coin Request ERC20
- Step 8: Documentation
- Conclusion


Pay With


